Showing posts with label DIY. Show all posts

Thursday, January 27, 2011

The Real Slim Shadey

A few months back, the hubs and I decided that our living room needed an update. It was a bit too neutral and needed a new hue. Ever since the addition of H2Ahhh (dontcha just love that name?) to our living room, something has just been off. For a while, I couldn't quite put my finger on it, and then it hit me. The curtains that had once complimented our oh so neutral living room, were now detracting from the new color and the new windows that were installed back in November.


For the last two months, I lived with the curtains, but they were slowly wearing me down. They needed to go. I wasn't quite sure  exactly what I was looking for, but just like I found my sweet husband, I knew that when I stumbled upon "the one" I would just know. Can you tell I'm missing him these days?

Last weekend, in search of the perfect fabric, I headed to the local fabric shop to peruse the aisles and came up with zilch. I was feeling defeated until I headed to the rear of the store to the higher end fabric that I can't really afford. And this is where I got lucky. I nearly squealed with excitement when I found "the one" for $22.99/yard and found that it was 50% off. I was sold. Hook, line and sinker. Sure $11 a yard was still a little more than I wanted to spend, but I was too head over heals in love with this fabric, I just had to have it.


I'm such a sucker for florals...

At the register checking out, Lady Luck struck again. When the cashier rang up my five yards of floral gorgeousness, I thought the total seemed a little low. What should have been around a $65 purchase was $33. I figured everything was just on super sale. It wasn't until later that I realized the cashier had only charged me for two of my five yards of fabric. Score!

Sidenote, when this happens to you, do you speak up, or just get super excited inside and pray they don't notice? My rule of thumb is:

If it's a big chain store, I get super excited inside. If it's a mom and pop shop, I speak up. 

Don't judge.

Anywho, I got the fabric home and quickly began to iron my new shades...

Yes you heard me, iron. I'm a girl that owns a sewing machine but I don't know how to sew. At all. Here is the tutorial on how to make them, and the inspiration is from Thrifty Decor Chick.

It took about three episodes of Dexter hours to make and hang my new window treatments, but I now have three gorgeous shades in our living room that cost a mere $6.20 each. Amazing! What do you think?


And for those of you that like the side by side before and after, this is for you:

Now that these shades are up, I realize how heavy looking the old curtains were. I had no idea that they were pulling down the whole room! These new shades are just what I needed to brighten up and give the living room a face lift. I just love the open and airy feel. I can't wait to accessorize the room to match the new curtains! I'm on the hunt for a new throw, and throw pillows.

What do you think? Are you a fan of shades or did your prefer the old curtains? Have you ever gotten free merchandise due to cashier error? Did you speak up or take the money and run?.

Monday, January 24, 2011

Bathroom Renovation Part Four: Womp, Womp, Womp

Well hey there strangers! It's been nearly a week since I've posted anything. Please excuse me. With report cards due Friday, my new workout routine plus Macie's dog training class (we'll touch on those another day) and the fact that I'm hosting nearly 20 people for our monthly OSC (Officer's Spouse Club) meeting on Saturday, I'm wiped. Oh yeah, I've also taken on making new shades for the living room, felting headbands, and some other general redecorating and crafts. I'm exhausted just typing it all...

But, my dear bloggy friends, I have some bad news... 
Our bathroom is not yet complete. And the hubs is gone for a month. I could cry. Cue the violins.

Due to a last minute broken tile saw, and the wrong sized nipple (the faucet's not mine thankyouverymuch!) we've been delayed. I could probably finish it alone but I want to do it with the hubs. We started this together, and will finish it together. Plus, I think I'm just a smidge over this project. However, I do have some updates to show you. Care to see?

The last time I showed you the bathroom, it looked a little something like this. No lighting besides our floor lamp, no sink, and, most importantly, no commode.


These days, we have a mostly functional restroom and a complete floor. I have to tell you, I am LOVING it. The vanity is about 6 inches narrower than the one we took out and it makes our teeny tiny bathroom feel so much larger. A wise choice on our parts, if I do say so myself.


As for the shower, we have two of the three walls tiled. They're simple and classic. We're very happy with the results. If you take a look at our unfinished third wall, here's what's holding up our entire bathroom remodel.

The pipe that sticks out of the wall and into the faucet is called a nipple. This stinkin' nipple has made it very difficult for us as our faucet will not fit onto it. We have to get some expert help to advise us and, luckily, I have a friend coming over tomorrow to help. Once this problem is solved, we will be able to tile around it. Don't you just hate uncooperative nipples?


So there you have it, the progress that's been made in the bathroom. Luckily, we have two showers so our out of commission shower has not been too big of an issue. 

Next update you get will be the final reveal. Let's hope it's much sooner than later!

Sunday, January 09, 2011

Bathroom Renovation Parte Three: Putting up Walls

It's been a while since I gave an update on our bathroom renovation. With the winter holidays over and the hubs and I back at work full-time, we've slowed down a bit. I'm thinking we should be completely done by the end of this week. Let's hope so because we have family coming into town on Saturday. Nothing like an impending visit from the in-laws to light the fire under our bums! For the record, my MIL is wonderful, but of course we want the house to look great for our guests (and we want to show off our handy work).

The last time I checked in with you all, our bathroom looked a little like this:


How's that for the rustic look?

I'm thrilled to tell you that we now have four painted walls, as well as most of tile floor laid. Since the whole process of rebuilding a room is not terribly exciting, this is mostly an informational post. I'm jam-packing it with how to's since I was clueless on how to hang dry wall. Though I'm still no expert, I am much more adept at the process and hope that our adventures (and mis-adventures) can help at least one other person.

If you notice in our photos, we didn't take down the entire wall. We removed what was behind the tile and salvaged the rest. This was for a few reasons:

1. We were exhausted after the demo process.
2. We're cheap and didn't want spend the money on more drywall.
3. We were a bit nervous to deal with ceiling and wall seams.

That said, hanging the dry wall below the existing plaster walls was no easy feat. Because the plaster walls were thicker than the dry wall, we had to figure out how to get our walls to meet seamlessly. The answer? Beef up the beams.


We used 1/4" furring strips to thicken our beams. Once we cut, hammered, and nailed the strips to each beam, we were ready to hang our dry wall. Since we're renovating a bathroom, we used green board which is water and mold resistant. Though it's bit more expensive than standard dry wall, it's definitely worth using in high humidity rooms. No one likes a moldy wall!

I won't share the details of hanging drywall because it truly is boring (if you need some tips, please ask away!), but we did learn a few tips in the process that are worth sharing:

1. After the drywall was hung, we used self adhesive waterproof mesh tape for the seams. So easy to use and cut.
2. We used pre-mixed joint compound (more expensive but wanted the right consistency) to mud the walls. It took three coats to get the look we wanted and we sanded inbetween coats. Remember to use drywall sand paper. It makes all of the difference!
3. Be sure each coat of mud is completely dry before sanding and applying the next coat.
4. When applying the mud, use puddy knives that gradually get bigger. We used 4", 6", then 8" knives, I believe.

When we were done, our walls looked a little something like this:


As a fun little intermission, I had the idea to leave a little love for future homeowners of our sweet, little home.


Is it wrong that this makes me a little sad?

For the shower walls, we used Durarock (or cement board). Though it's heavier and more expensive then green board, it is the right product to use as it's water proof. You definitely don't want water getting to those beams!


A big debate that we came across in the renovation world is whether or not to use a vapor barrier in between the durarock and the beams. This barrier is to ensure that no water can get in and rot the wood in the walls. Some say it's effective, others say it can actually hold moisture and, in turn, cause more damage. After speaking to a few experts, we decided to use the vapor barrier on our exterior wall since that is where the cold air enters our home. After re insulating with the free insulation we found in storage from the previous owners (cha-ching!) we put up the vapor barrier with a staple gun. Easy as pie. Note: always wear a mask, gloves, and cover your skin when insulating. Fiberglass in your skin or lungs is not fun.

As for the paint, before we could get the color on the wall, it was important to prime the green board, otherwise it will soak up paint. After a quick application of primer, we used a Glidden brand paint called Silver Drop. I had the solution cut down 25% to make the shade a little lighter. The color is a very soft gray that would look white if not compared to the ceiling. I love, love, love it. The hubs thinks it looks white, but he's just happy I'm happy. Gotta love that sweet husband of mine.


And that, my friends, is how we're looking these days. I have to tell you, we are so proud of how our walls turned out. For first timers seaming two walls made of different materials, we feel we did a heckuva job! There are slight imperfections, but they can easily be attributed to the fact that our house is 50+ years old. Just more character adding to the charm of our home, right?

Before I go, I will leave you with two images. The first one is a sneak peak of how our bathroom is looking at this very moment. Digging the tile? The second, my two favorite boys. Mattingly is a constant fixture at the bathroom door while we work. I think he's over the renovation. He's one good looking dog...and the hubs isn't so bad himself!


Stay tuned for our tile reveal and how to...coming soon!

Thursday, January 06, 2011

Reving it up!

We all have them; those pesky pet peeves in your home that just irk you to no end. Most of the time, they're an easy fix, but not quite problematic enough to put effort into amending. You must have at least one if you think about it long enough. I'll give you a minute....

Got it?

Ours was in the kitchen.


If you've seen our kitchen, you'll be quick to notice that it's not very large. It's long and narrow, which doesn't allow much space for a trash can. Plus, I'm just not a fan of exposed trash. I like to keep it hidden, I'm secretive like that. So, to cater to our kitchen and my needs, we threw a small plastic bin under the sink. A fine solution, except that I always, always found trash in the cabinet. We have bad aim, what can I say? I was fed up with picking up trash from the cabinet...one Kraft Single wrapper too many threw me over the edge. 

I decided to put an end to our trash issue on one of our recent Lowe's trips. The solution? The hubs and I bought our very first under the cabinet pull out garbage can kit from:

check out more of their products here

I was so very anxious to install our Rev A Shelf and whipped out our drill as soon as we got home. Then I ran into a problem...


The cabinet wouldn't close. In my moment of excitement, I forgot to measure to ensure our new trash can would fit. Due to our feed from the dishwasher, it didn't. Drats!


Lucky for us, I was able to think outside of the cabinet box and put the new Rev a Shelf under the left side of the cabinet where there are no pipes. And wouldn't you know, it fit like a glove. Well not quite like a glove, but you get the point.


After four quick screws and a switcheroo of our cleaning supplies, our pesky problem was solved.

Don't you just love organization? It makes my heart flutter.

For the record, it's now been about three weeks since we've switched our garbage can set up, and I'm happy to share that our cabinets are free of debris. The downside? The hubs and I are creatures of habit and haven't adapted to it's new location. We'll get there...hopefully!

Now that I've shared our silly little home issue, I want to know about yours. What is that one (or more) thing in your home that is so irritating but not quite worth your effort? Or maybe you're crazy like me and need to fix what's not quite that broken. Do you own any Rev A Shelf products and love them as much as we do?

Monday, January 03, 2011

Bathroom Renovation Part Three: The Demo

When we decided to take on our bathroom, the part my hunka, hunka burnin' muscle hubs most looked forward to was the demo. He was so excited to wreak havoc on the dated tiled and peeling walls. I, on the other hand, was a little leery. Either way, we were two eager DIYers ready to put the smack down on our 51 - year old bathroom. No hold's bar if you will. Unfortunately, our bathroom was not going out without a fight. So while we were ready to put the smack down on our bathroom, it definitely smacked back.


See that smile on my face as I removed the first tile? Let's call this the, "ignorance is bliss," photo. Though that first tile came off easily, we had no idea what our middle aged beast of a bathroom had in store for us.


Did you feel that? Yep, this was our first smack across the face. It left a mark. A big, red welt right on the cheek. Behind the 1/4 inch tile was about 2 inches of cement and metal lathe. I compare metal lathe to a very thick chicken wire that is super sharp. This is how tile was laid before thinset and cement board. Built to last. Had our bathroom lacked a window, I think it would be safe it say it could double as a bomb shelter. Seriously.

That said, a hammer and chisel were not going to cut it so we had to bring in back up to win this fight. Enter, the demo and sledge hammer. We shelled out the $90 at Home Depot to rent some power tools help bring down the walls. Did I mention that we had this tile on all.four.walls of the bathroom? Lucky us.  


Over the course of the next 48 hours (20 of which were spent working) the hubs and I (but mostly the hubs) brought down the house bathroom walls.


Talk about one heck of a mess. Our bathroom floor and tub were filled like this four times. Each time the rubble grew too high (about seven inches), we had to shovel it out so we could walk. In the end, we filled 28 black contractor's garbage bags full of tile and cement. We filled two 90 gallon garbage cans with the metal lathe. Our trash collectors are not our number one fans these days.


In the end, through the blood, sweat and surprisingly no tears, we cleared out the bathroom and took the next day off. We were too sore, tired, and beat up to work!

Stay tuned for the next installment when we put the room back together! I am happy to say that we now have four, complete walls in our bathroom! Yahoo!!!

Sunday, January 02, 2011

Bathroom Renovation Part Two: Inspiration

It was easy for Paul and I to decide that we didn't love our bathroom and it needed a face lift. However, deciding what to install was not so simple. With the selection of tiles, vanities, mirrors, and paint swatches available, the options were endless. After hours of searching the internet and walking up and down the aisles of Home Depot and Lowes, we decided that simple was key. The truth is, as a military couple, we won't be in our home forever (I'm tearing up already) so while we need to love what we do to our house, it also has to be appealing to buyers.

We're still in the process of recreating a room by hanging drywall and cement board so we're no where near finished. Most likely, it will be a few more weeks until the room is put back together and I can show you all of our finished hard work (don't worry, I'll have pics and updates along the way!).

What I can show you right here, right now, are some inspiration pictures that I have found all over the web to give you an idea of what you can expect in our new bathroom.


We love the airy look of this white bathroom. Though it's a teeny, tiny bathroom like ours, the continuity of white, plus the natural lighting, makes it feel open. We're not going with a pedestal sink because we need more storage, but how cute is that shower curtain? Love the delicate and fun print!


Since our home was born (yes, born) in 1959, the goal for our room is to keep with the era of the home mixed with modern appeal. We are big fans of black and white tile (just take a look at our kitchen). To us, black and white screams elegant, simple, and timeless. We want the bathroom to look like it could be original to the home. Another bonus of black and white? It allows you to accessorize with any color to change up the look of a room. Don't you love the little topiary on the counter? I hope to incorporate some sort of live (looking) plants as well.


How gorgeous is this white subway tile? To me, subway tile is like Ryan Reynolds' abs; the more I see, the better. I just can't get enough. While we will not tile any walls other than our shower (you'll see why when I show you the demo process tomorrow), we will definitely incorporate subway tile in our new bathroom. Perhaps with a black and white octagonal insert? You'll just have to see!

So, what do you think? Anything you love or maybe you don't care for? Do you love black and white tile as much as us? Maybe you don't care about our bathroom and just want to talk about Ryan Reynolds and his abs? Not a problem! Nothing is up yet so we still have the flexibility to change our ideas or add some new ones!

Wednesday, December 29, 2010

Bathroom Renovation Part One: The before

I don't think I told you that the hubs and I were supposed to take a vacation to New Mexico over our Holiday Break. We had our tickets and hotel booked, and were supposed to leave today. Well, the Navy had other plans for us so, due to military obligations, our vacation got the big C. As in, canceled. I picture the giant red stamp coming down...further pounding the finality that our Holiday vacation is sans vacation. Cue the sad music and clown with tear drop.

With the money saved for the vacation and a week with no work on our hands, we've decided to take on a project. It's just how we roll. So, our upstairs bathroom is under renovation. Not just a little revamping like we did in the downstairs bathroom, we've taken this sucker down to the studs! It is so disgusting and embarrassing and has been the bane of our existence since we moved into our home. I don't even show it to people when they come over and want a little house tour. But you, my loving and non-judgmental (please) bloggy friends, are in for a treat. Here's the grand tour of our absolutely horrid bathroom.

From far away, it's a bit dated, but not terrible. Not particularly attractive, but clean and functional enough. How do you like the shelving units that came with the house. If you look closely you will find dirt, gunk, and rust stains. Shall we continue?


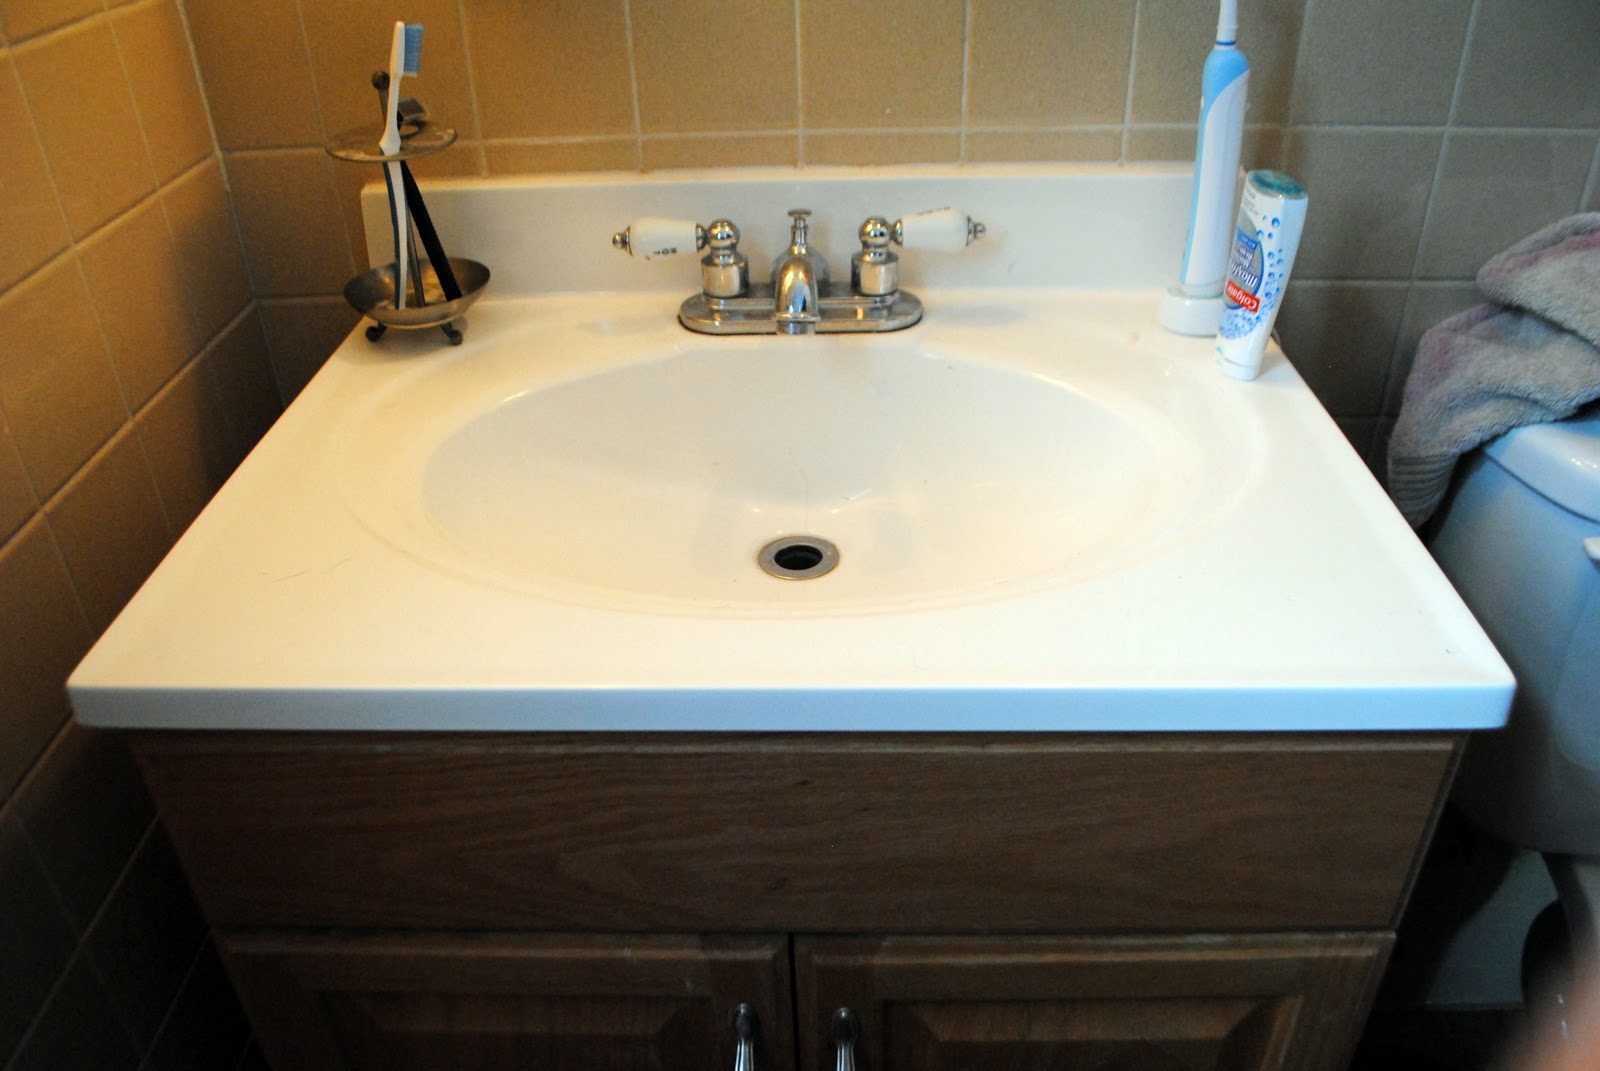
As you look into our 1950's mirror and antiquated lighting fixture, you will notice the peeling paint. There are spots like this all over the walls. You can also see our cookie cutter, blah vanity. Over it! I'm so embarrassed- you're not judging right?


Let's look at shower and tub. Are you digging the beige square tiles? They are reminiscent of a hospital and, when you get really close, the grout is turning different colors. This tile surrounds the entire bathroom. All.four.walls. Oh gosh...should I keep going?


Now for the tub. This big hunka metal is cast iron and weighs 300ish lbs. They don't make 'em like this anymore! The finish is wearing off of the bottom so it's rough and looks brown- I swear it's not dirty! I've been dying to take a bath for over a year and this tub just won't allow for it. It's official- I'm humiliated.


There you have it, my friends, the embarrassment of our home. The dated, dirty, disgusting bathroom that we've lived with for the last nearly 18 months. We've spent the last two days demolishing this monstrosity and I have so much to share, but I'm just too exhausted to get it all out. Demo is not for the weary. Stay tuned for lots of rubble, power tools, and a sledgehammer heading your way!

LinkWithin

Related Posts Plugin for WordPress, Blogger...